
Transform your entrance into a show-stopping display with this easy DIY tutorial
In this tutorial, you'll learn:
- How to create a stunning giant bow decoration for under £20
- The wire mesh technique that gives your bow professional structure
- No-sew alternatives for finishing fabric edges
- My top tip for preventing lumpy, weather-damaged fabric (learned the hard way!)
- How to safely hang your bow on brick, mortar, or siding
- Ways to customize the size and color for your space
- The secret to achieving those gorgeous flowing tail drapes
Perfect for: Beginners | Budget-conscious decorators | Renters and homeowners | Anyone who loves a statement Christmas display
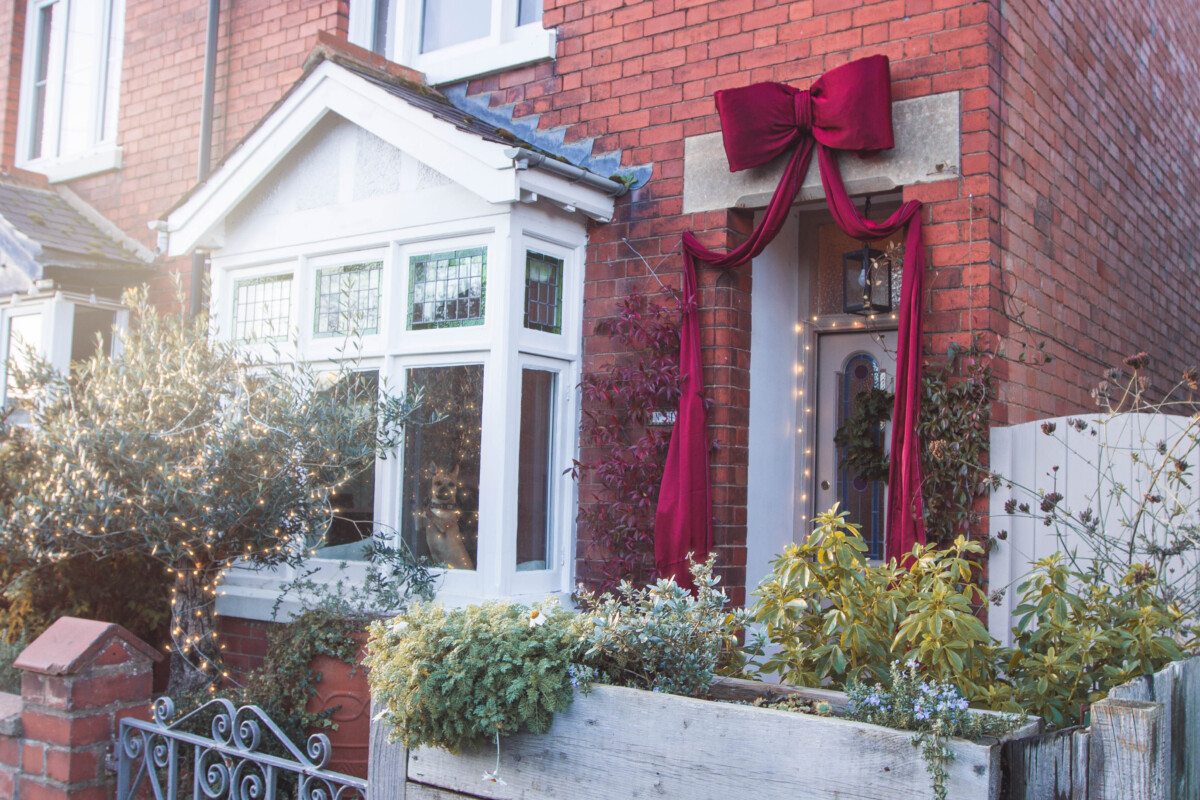
There’s something magical about a beautifully decorated front door at Christmas. This year, I decided to go big – literally – with a giant bow decoration inspired by a stunning display I spotted on social media.
I was scrolling through Instagram when I came across a post featuring Estelle Manor in Oxfordshire. The manor house’s entrance was adorned with the most gorgeous oversized blue bow, and I was instantly captivated. Coincidentally, the manor is near where I used to live years ago, which made it feel even more special.
I knew I had to recreate this look for our home – but in festive red!
Watch the Full Tutorial
Before we dive into the written steps, you can watch my complete video tutorial here:
What You'll Need
The best part about this project? It’s surprisingly affordable and you don’t need fancy equipment!
Materials:
- 3.5 metres (4 yards) of fabric – I used liquid satin polyester, 150cm (59 inches) wide
- 2 metres of PVC wire mesh netting – 50cm (20 inches) wide (available at DIY stores in 10-metre rolls)
- Hot glue gun (or Gorilla Glue super glue tape as an alternative)
- Wire cutters
- Black bin bag or plastic wrap (if using thin fabric)
- Wire for hanging loop (I used the wire from the mesh roll)
Optional Sewing Supplies:
- Overlocker or sewing machine
- Iron-on hemming tape (no-sew alternative)
My spend: £8 on fabric from Vinted, £10 on wire mesh =
a total cost of under £20!
Step-by-Step Instructions
1. Prepare Your Fabric
I sourced my fabric from Vinted (a great option for budget-friendly materials). Start by dividing your 3.5-metre length into three 50cm-wide strips.
For two of these strips, finish the raw edges on the long sides. You have several options:
- Overlocking (my method)
- Rolled hem by machine or hand
- Iron-on hemming tape for a no-sew option
- Leave unfinished if your fabric doesn’t fray
Keep the third strip aside – this will become the bow’s centre band.
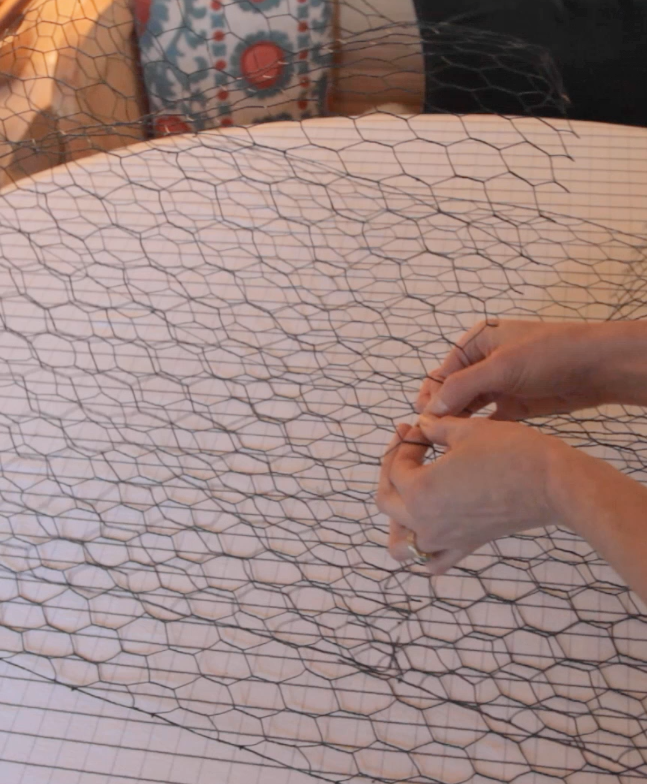
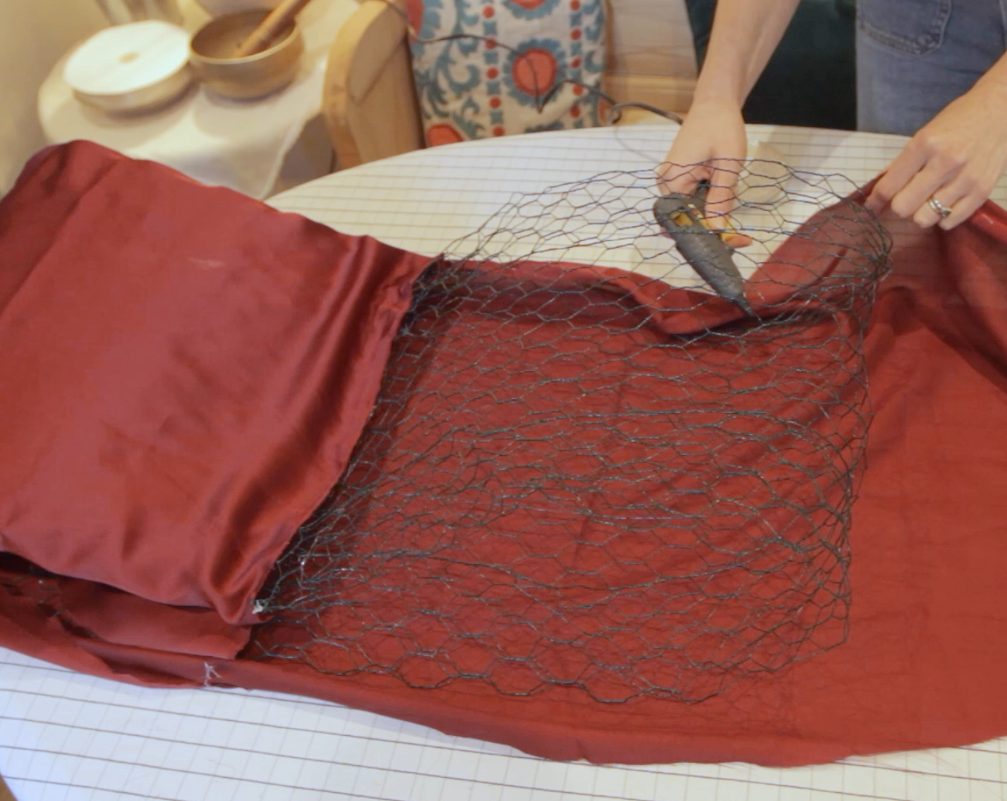
2. Create the Wire Mesh Structure
This is where the magic happens! The wire mesh gives your bow its structure and shape.
Unroll enough mesh to give you just over 70cm (27.5 inches) when folded – this will be the width of your finished bow. Using wire cutters, cut all along the mesh joins to separate a section.
Bring the two cut edges together and fold the free wires over each other to secure them. Position this joined seam in the centre of your mesh tube – this will be the centre of your bow.
Safety tip:
If children are helping, have them wear gardening gloves to protect their hands from wire ends.
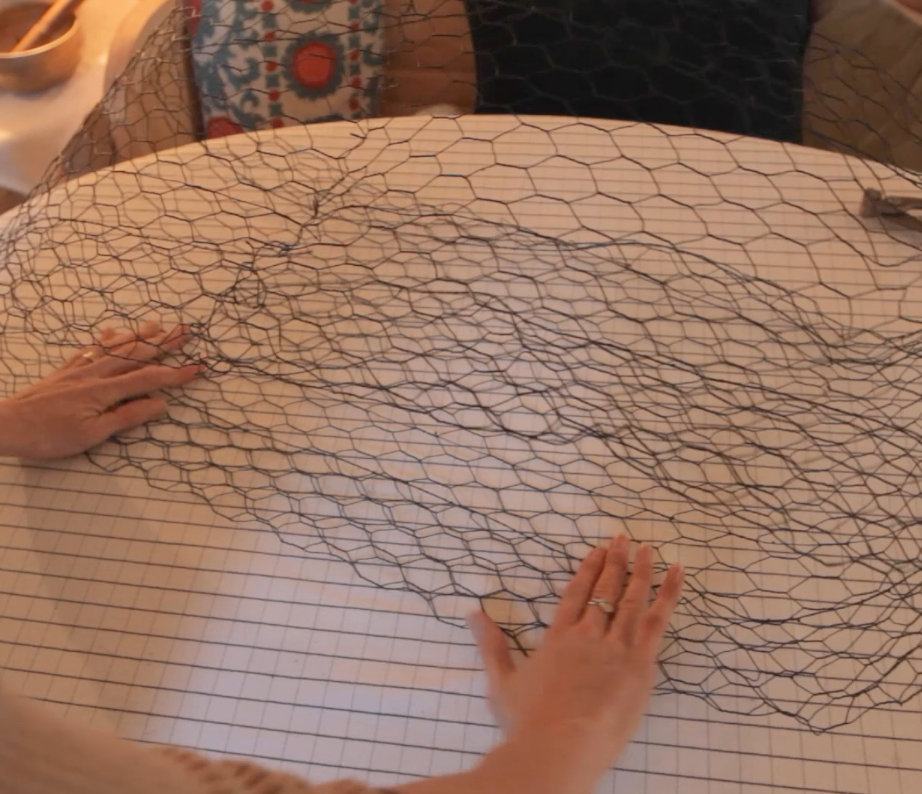
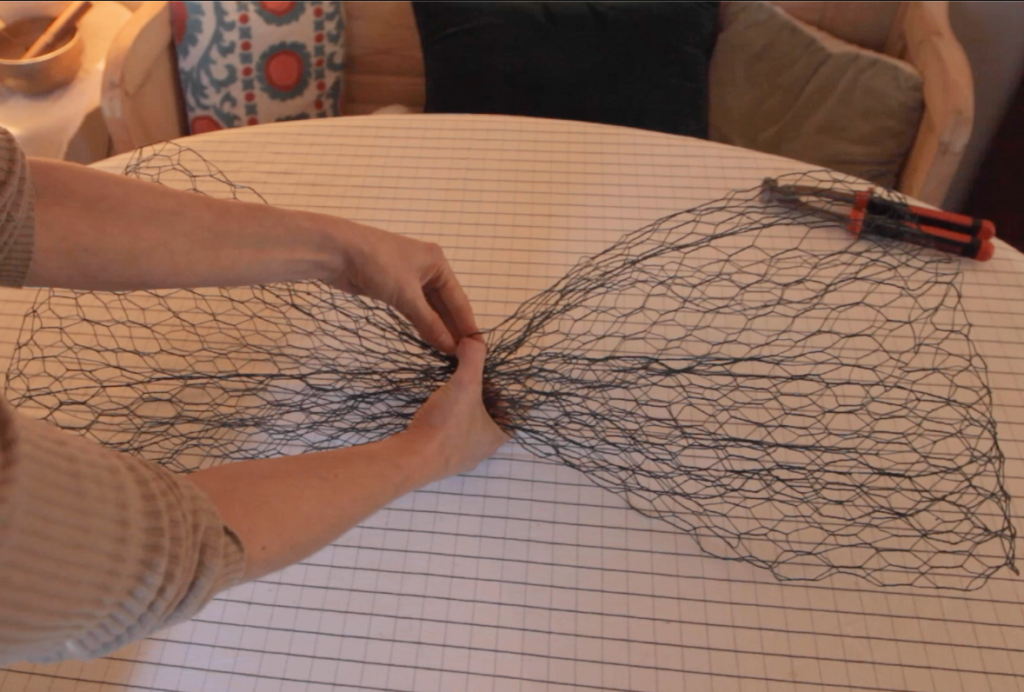
3. Shape the Mesh
Here’s a clever trick to make your bow look professional: fold the top and bottom edges of the mesh inwards. This creates a border that your fabric can wrap around and gives the bow much more structure.
When you pull the centre in, you’ll already see a beautiful bow shape forming – even before adding fabric!
Important tip I learned the hard way: If you’re using thin fabric like I did, wrap your wire mesh in plastic first. I initially skipped this step and realized the fabric would look lumpy and could develop mould in wet weather.
Use plastic wrap, a black bin bag, or old plastic bags to cover the mesh. If you’re using thicker fabric like fleece or felt, you can skip this step entirely.
4. Attach Your Fabric
Now for the satisfying part – covering your bow!
Lay your fabric right-side up on top of the mesh. Add dots of hot glue along the folded edges of the mesh and press the fabric down to secure.
Work your way around the bow:
- Glue the top edge
- Glue the bottom edge
- Turn the bow over and wrap the fabric around the ends
- Continue until the entire bow shape is covered
- Trim any excess fabric at the centre where you started
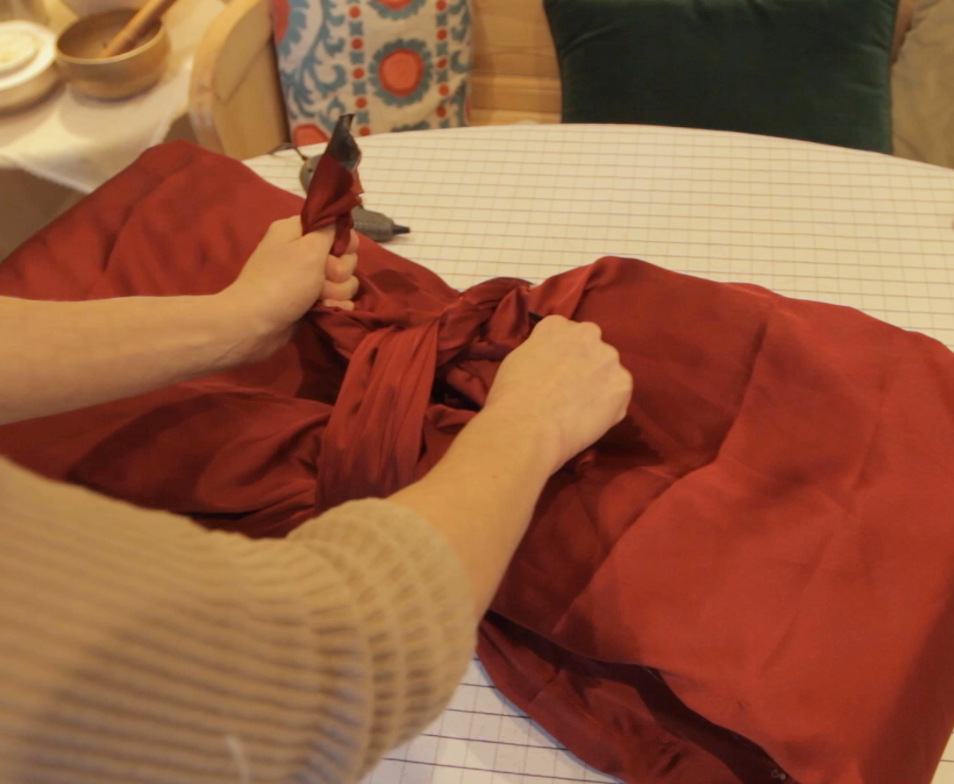
5. Create the Centre Band
Take your remaining fabric strip and fold it over the centre of the bow to draw it together. This creates that classic bow pinch in the middle.
I simply tied the fabric at the back into a knot and secured the loose ends with hot glue. Use your hands to reshape the rounded sides of the bow to give it a nice, full appearance.
6. Add the Flowing Tails
Turn your bow around and attach those beautiful long strips you finished earlier. Use generous dots of hot glue to secure them, keeping the tails as long as possible.
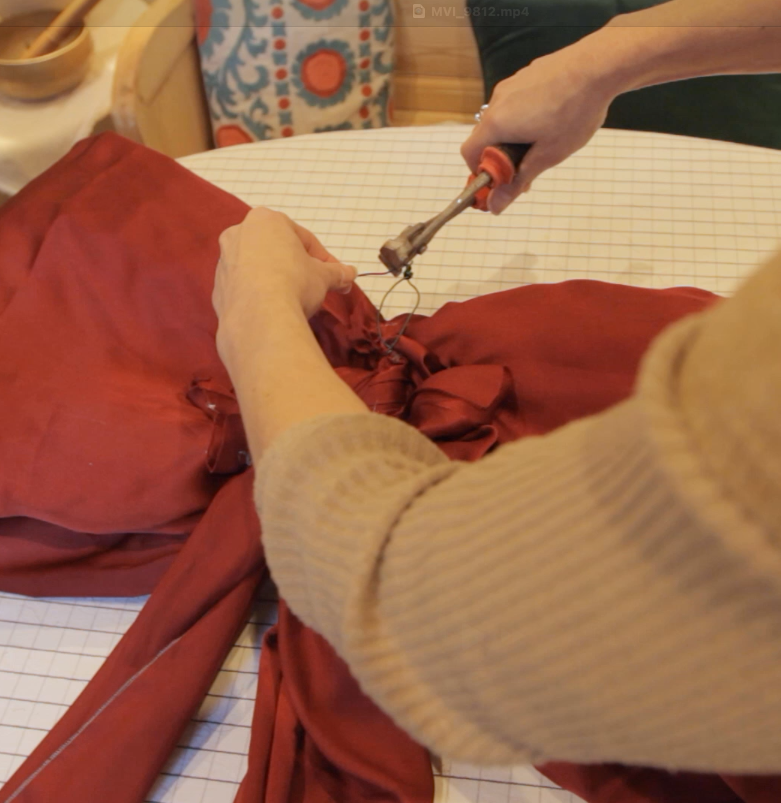
8. Create a Hanging Loop
For the hanging mechanism, I used a piece of the wire that kept the mesh roll secure. Cut a length of wire, thread it through the mesh at the centre back of the bow along the top, and twist the ends together.
Hanging options:
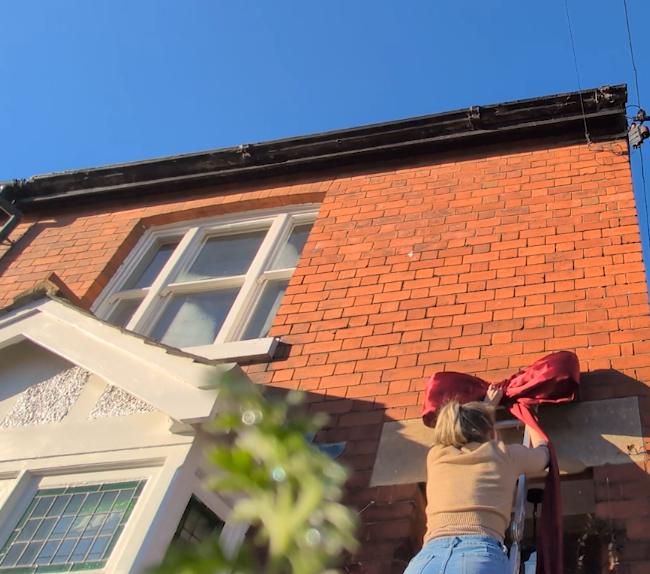
- Nail in mortar (my method – avoids damaging the lintel)
- Brick clip if you prefer not to make holes
- Over-door hook for lighter bows
8. Installation
The moment of truth! I carefully climbed a ladder to insert a nail into the mortar between the bricks and hung my bow.
Then I draped each tail to the sides of our porch entrance. I was lucky to have plant climbing supports already installed that I could loop the fabric over, but you could use:
- Command hooks
- Small nails or hooks in the wall
- Decorative brackets
Our porch entrance is quite high, so I needed long tails, but you can adjust the length to suit your space. Feel free to create more dramatic draping for extra impact!
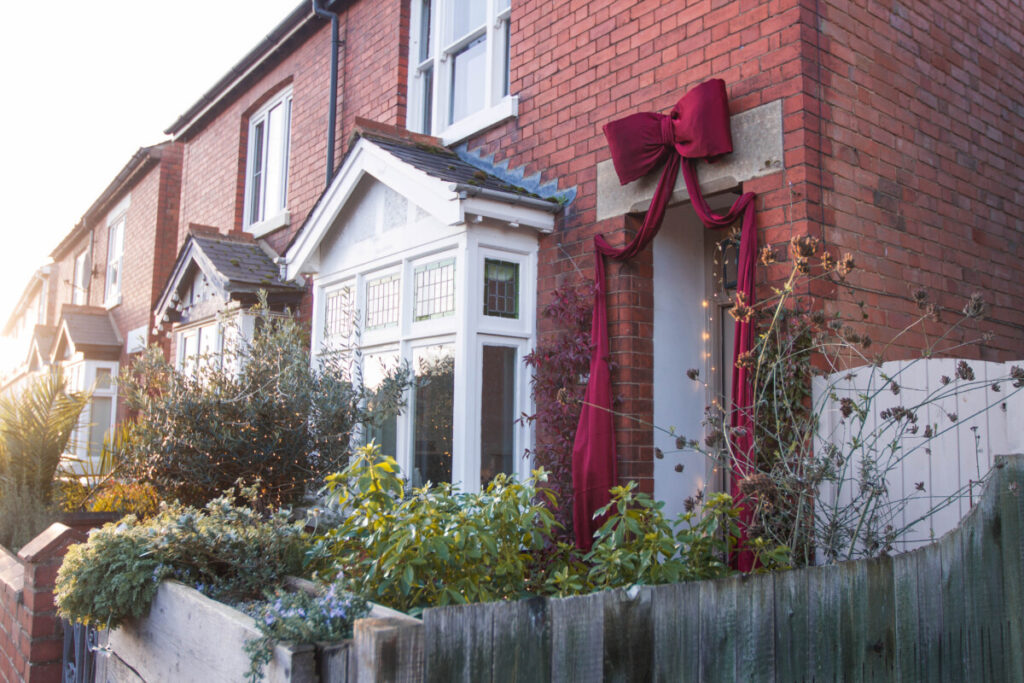
The Final Result
And there it is! My show-stopping giant bow Christmas decoration that looks like it came from a manor house but cost under £20.
I paired it with a simple wreath made from garden cuttings – ivy, holly, and laurel – because the bow truly steals the show. It’s by far my favourite front door Christmas decoration yet!
I hope you enjoyed this tutorial and feel inspired to create your own version. If you make one, I’d absolutely love to see it! Tag me on Instagram@sewillow_patterns or leave a comment on the YouTube video.
Happy decorating! 🎀🎄

